
There was a question via twitter on how to put an assembly inside an assembly. After thinking about it, I think the best answer is that you put an assembly inside an assembly the same way you put components inside an assembly. The mates are the same, you just get the added benefits of sub assembly mates that you can update at the sub assembly level. If there are any questions about this, please ask in the comments section and we can discuss it further.
We are going to move onto flexible assemblies and collision detection. I'll be honest, before the CSWP, I did not know you could make a sub assembly flexible. Crazy right? So, it's a simple matter. If you open up the Segment 3 Assembly file in the folder via the link above you will see a Cylinder Assembly located in the design tree.
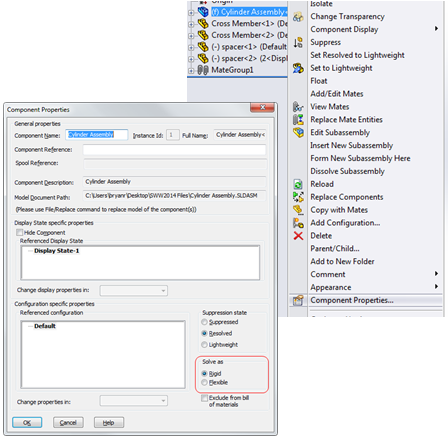 If we right click on the Cylinder Assembly in the design tree, we can select Component Properties and open our Component Properties window. In the bottom right hand of this window, you will see a Solve as area. Change it from Solid to Flexible. Going back through this, I also noticed that SOLIDWORKS loaded this as lightweight in my session. It will need to be resolved before you can select flexible. Doing this will allow the sub assembly to use the mates in the sub assembly to solve for location of the piston inside the cylinder.
Now if we look again at our main assembly, you can see that we can grab one of the cross members and move it around and it will actuate the cylinder. Granted, you could do the same thing if you put the components into the main assembly individually, but what if you purchased this cylinder and the supplier gave you an assembly model?
 Next, let's look at collision detection. Say we want to know how far the cross members will actuate when the cylinder is fully retracted. Select the Move Component function from the Assembly tab, in the Move Component window, select Collision Detection, These components, then click on the piston and cylinder. Click Resume Drag and then grab the cross member in the model and drag it. You'll notice when the cylinder is fully extended, the cross members just sweep by each other and flip to the bottom of the assembly, but when you drag it up, it stops. If you have the transparency turned down on the piston and cylinder, you can see that the piston bottoms out in the cylinder and the assembly stops. If we leave it at the stopping point, what is the angle between the two cross members?
Next time we will look at interference detection. As always, if you have any questions, please ask in the comments section.
Enjoy,
Bryan
No comments:
Post a Comment